New button
You can use the New button to initiate:
The New button also provides access to templates and the API_network.
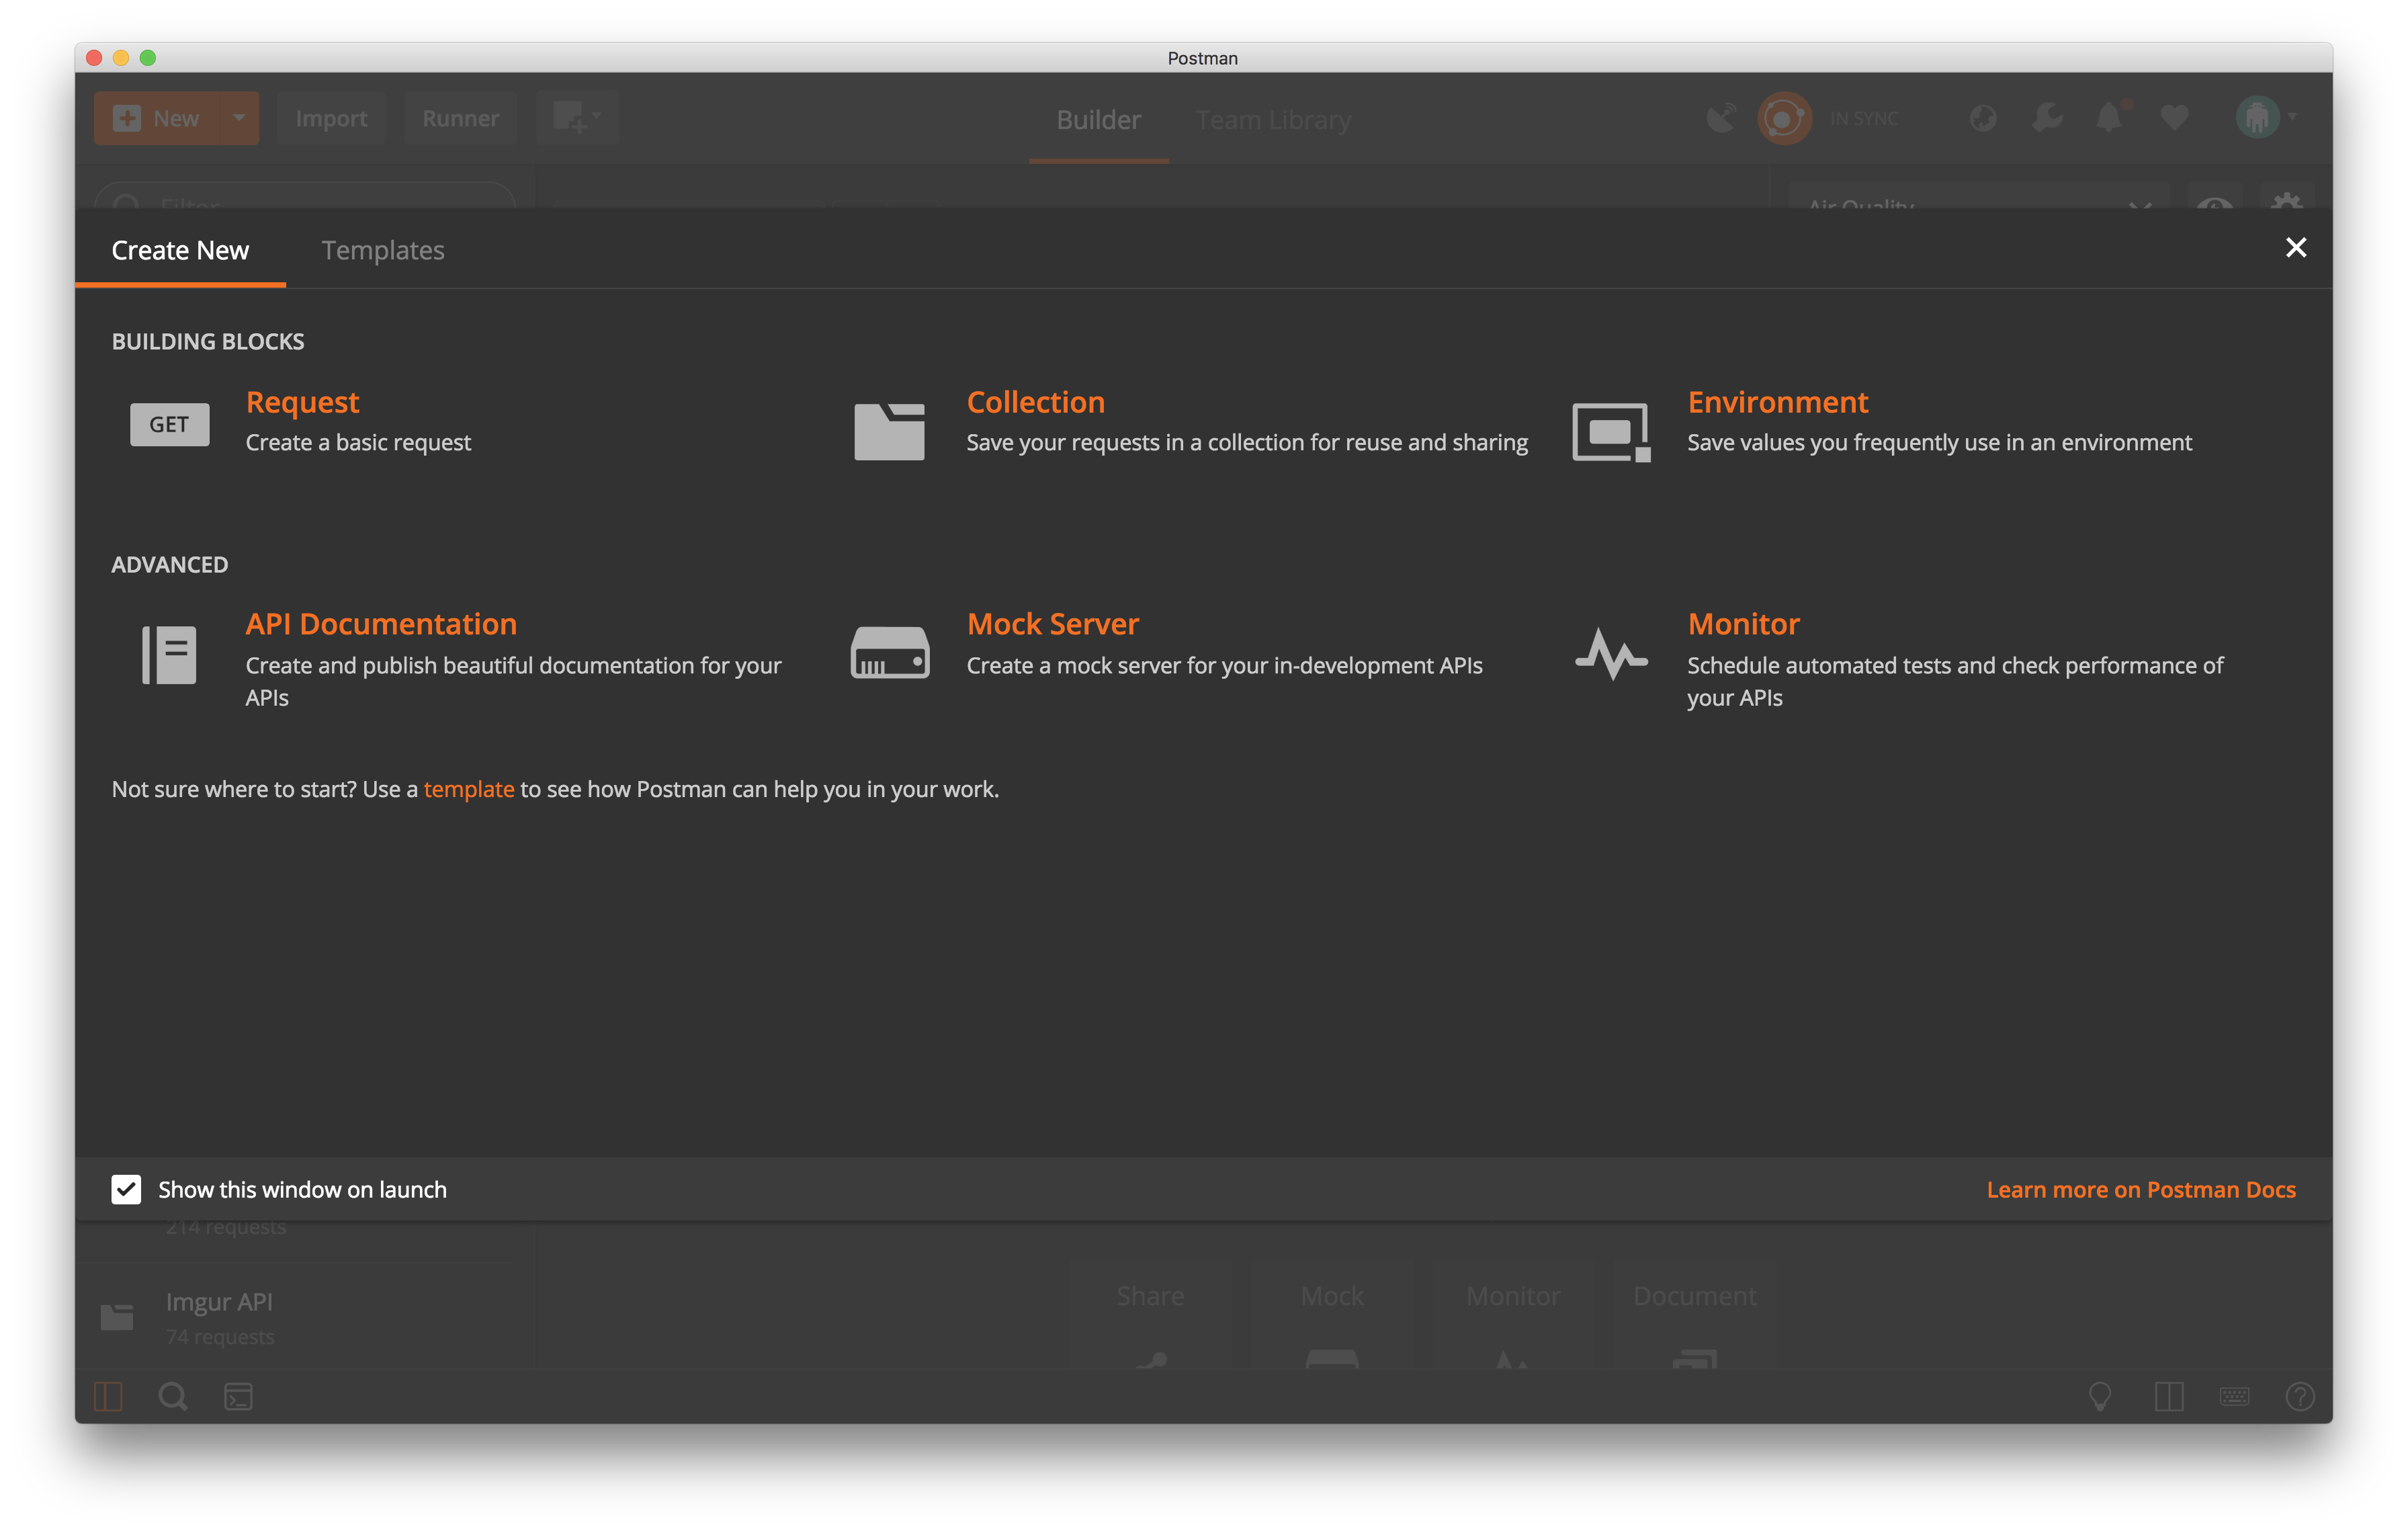
When you click the New button, the Create New tab appears as the default view.
In addition to the Create New tab, there are two other tabs: “Templates” and “API Network”. For more information about these tabs, see the Templates and API Network sections below.
Create New
In BUILDING BLOCKS, create a new request, collection, or environment.
In ADVANCED, create a new monitor, documentation, and a mock server.
Note: At the bottom, you can select “Show this window at launch” to indicate whether you want the Create New tab to display each time you open Postman.
Note: You can directly create a new feature when you click the down arrow at the right side of the New button.
BUILDING BLOCKS
Creating requests
You can create any kind of HTTP request.
- In the header toolbar, click the New button.
- In the Create New tab, click “Request”.
- Select a collection and save the request in it.
You can either create a new collection or select an existing one. After you save the request, you can add the URL, method, headers, and body to the request in the builder.
Creating collections
A collection is a group of individual requests that you can organize into folders.
- In the header toolbar, click the New button.
- In the Create New tab, click “Collection”.
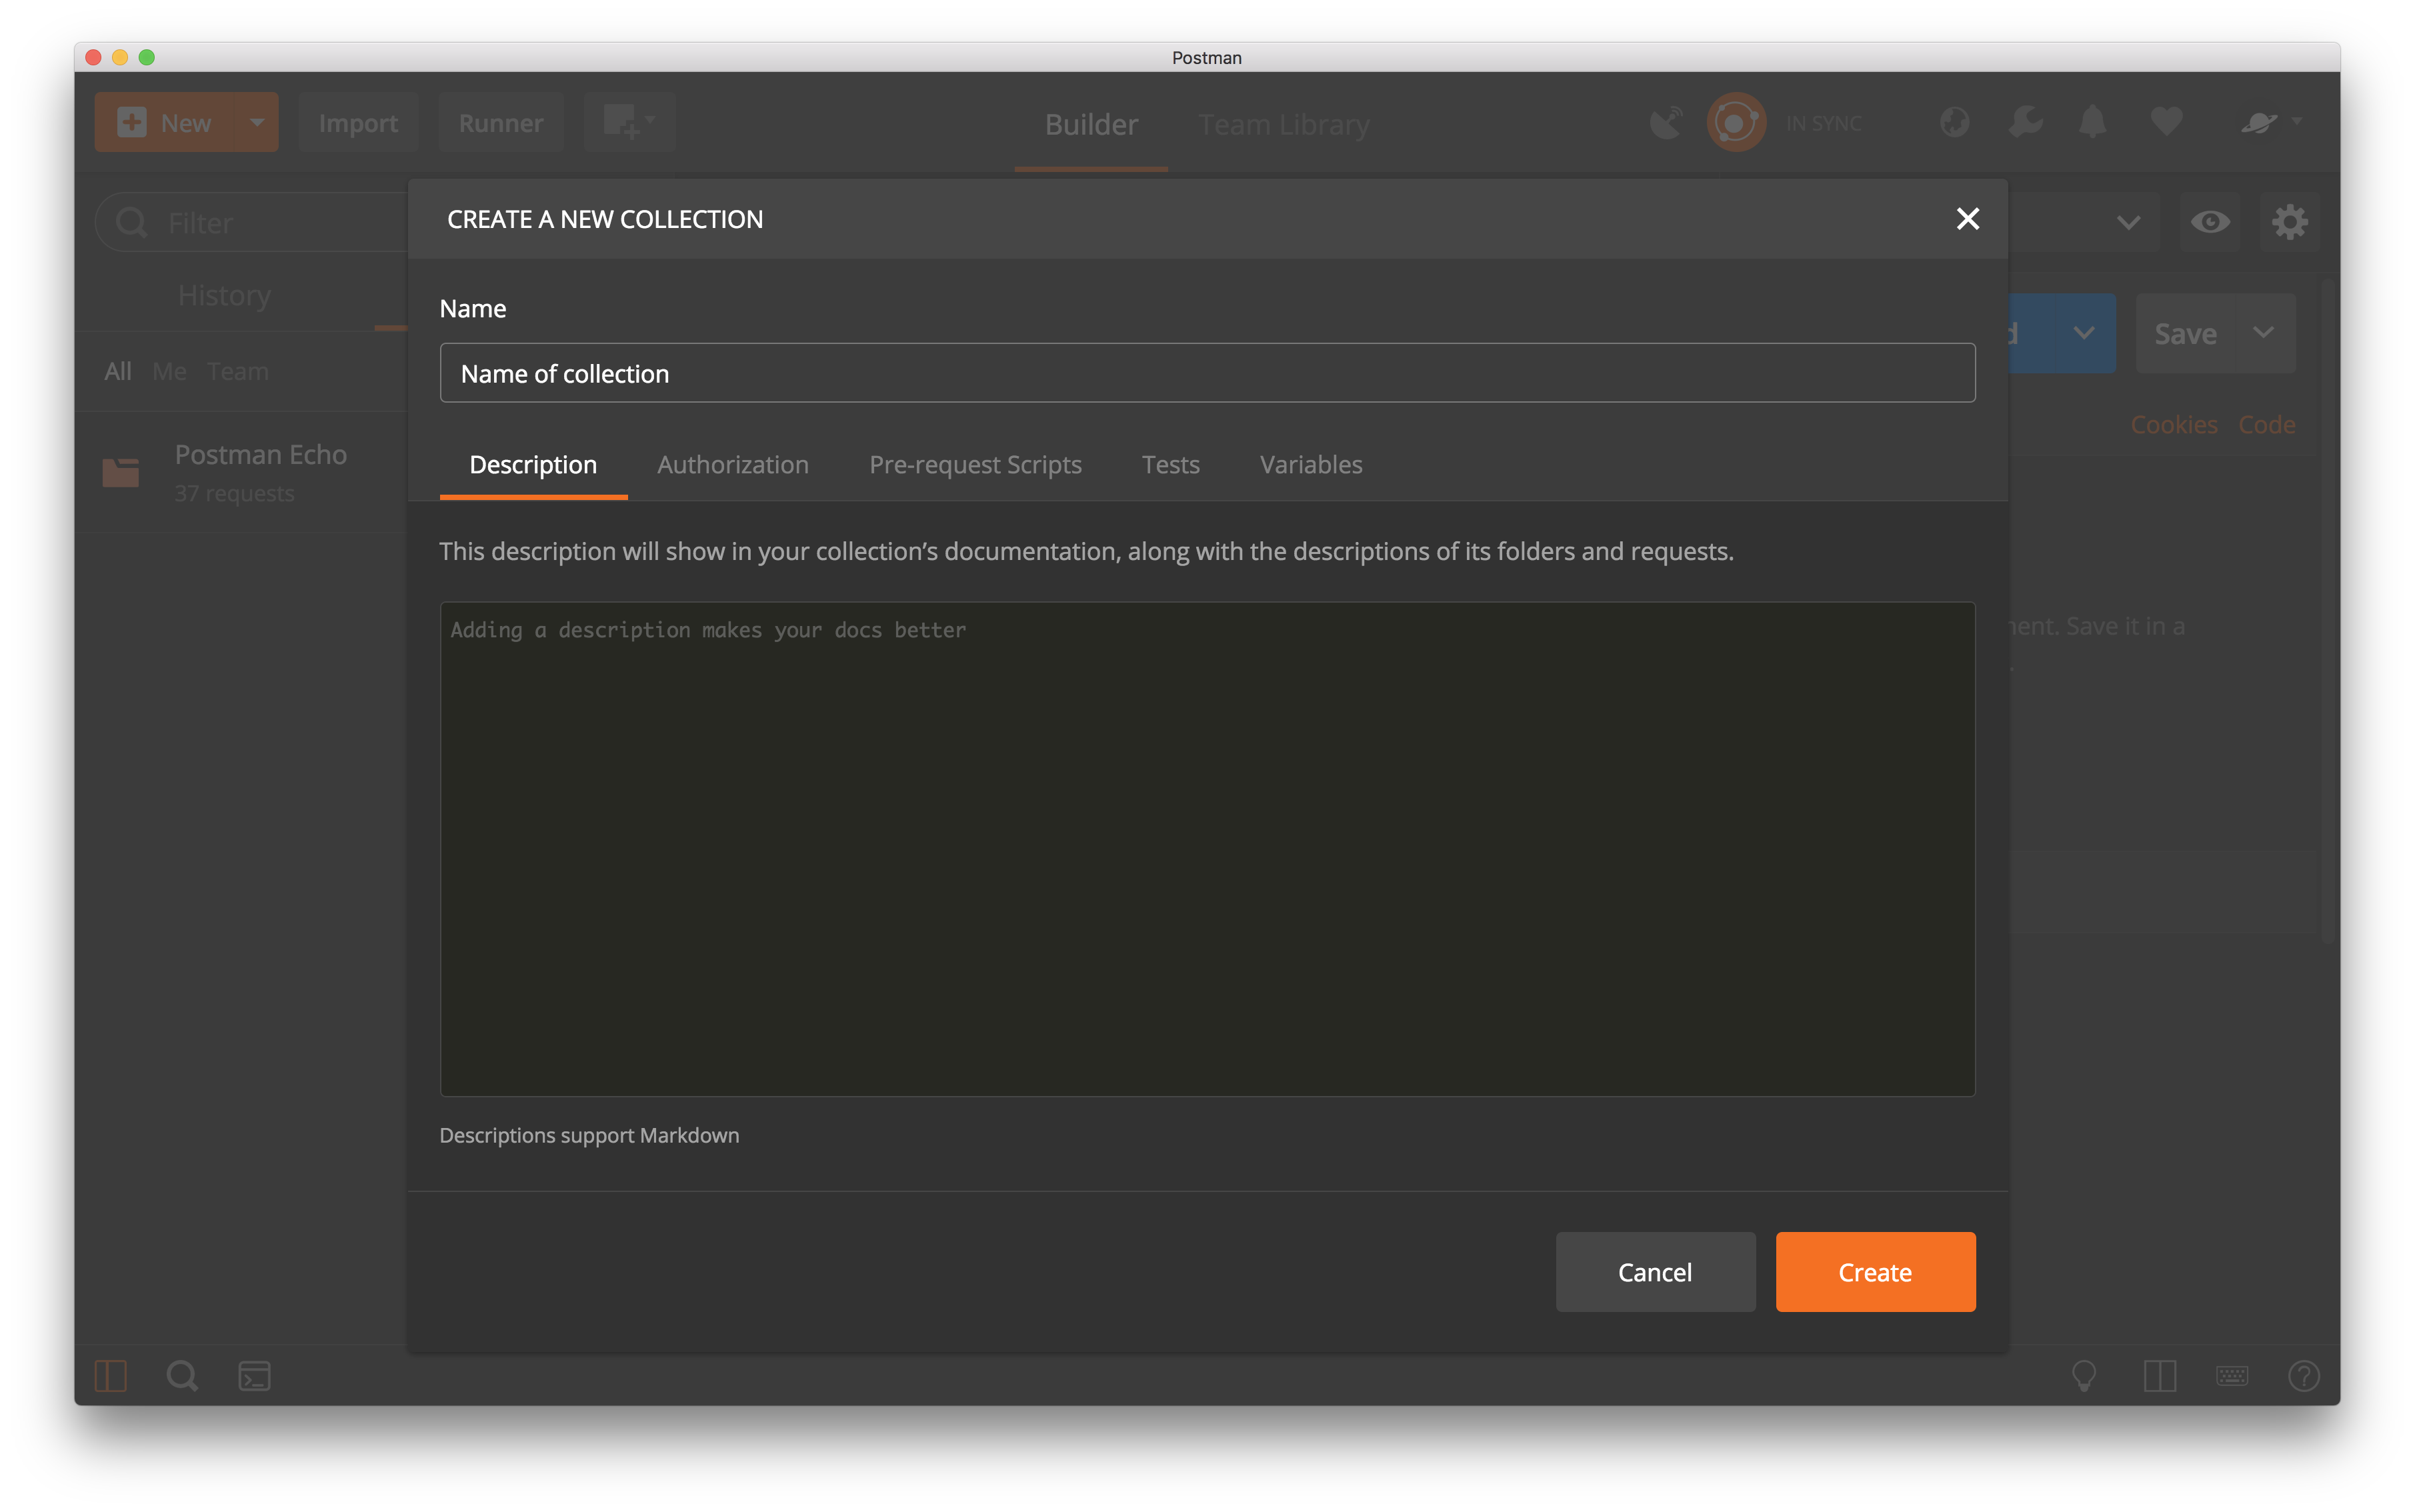
- In the CREATE A NEW COLLECTION modal:
- Enter a name and optional description.
- Select an authorization type.
- Enter a pre-request script to execute before the collection runs.
- Add a test to execute after the collection runs.
- Add variables to the collection and its requests.
- Click the Create button.
After creating the collection, you can save requests to the collection and add folders for better organization.
Creating environments
While working with APIs, you often need different setups, such as your local machine, the development server, or the production API. Environments let you customize requests using variables.
- In the header toolbar, click the New button.
- In the Create New tab, click “Environment”.
- In the MANAGE ENVIRONMENTS modal, add the variables you want to save as key-value pairs.
- Click the Add button.
If you’ve created other environments, the MANAGE ENVIRONMENTS modal appears again and displays them. You can share, edit, download, or delete those environments. In addition, you can create global environments and download them as a JSON file, or import environment files from your computer.
ADVANCED
Creating monitors
A monitor runs a collection periodically to check its performance and response. You can set a monitor to run as frequently as every 5 minutes.
Note: At the bottom, you can select “Show this window at launch” to indicate whether you want the Create New tab to display each time you open Postman.
- In the header toolbar, click the New button.
- In the Create New tab, click “Monitor”.
- Select if you want to monitor a new API or an existing or team collection. If you create a new API to monitor, you must select a request method and enter the request path, response code, and response body. If you use an existing or team collection, you must select a collection from a list of existing or team collections.
- After you select or create the request you want to monitor, click the Next button.
- In the Configuration tab, you must:
- Enter the name of the monitor
- Select an environment (optional).
- Set how frequently the monitor should run.
- Select one or more regions of the world from where you want to monitor your results.
- Click the Create button.
In the Next steps tab, see a list of suggested next steps to get the most out of your monitor.
Creating documentation
You can create public or private documentation and share it in a web page. Postman generates and hosts browser-based documentation for your collections automatically in real-time.
- In the header toolbar, click the New button.
- In the Create New tab, click “API Documentation”.
- Select if you want to create documentation for a new API or an existing or team collection. If you create a new API to document, you must select a request method and enter the request URL, description, and status code. If you use an existing or team collection to document, you must select a collection from a list of existing or team collections.

- After you select or create the request you want to document, click the Next button.
- In the Configure documentation tab, you must:
- Enter the name of the documentation.
- Add a description of the documentation. You can use markdown to add headings, lists, code snippets, and so on in your description.
- Click the Create button.
In the Next steps tab, see a list of suggested next steps to get the most out of your documentation.
Creating mock servers
A mock server simulates each endpoint in a Postman Collection. You can mock a request and response in Postman before you send the actual request or set up a single endpoint to return the response.
- In the header toolbar, click the New button.
- In the Create New tab, click “Mock Server”.
- Select if you want to mock a new API or an existing or team collection. If you create a new API to mock, you must select a request method and enter the request path, response code, and response body. If you use an existing or team collection to mock, you must select a collection from a list of existing or team collections.
- After you select or create the request you want to mock, click the Next button.
- In the Configure mock server tab, you must:
- Enter the name of the mock
- Select an environment (optional).
- Indicate if you want to make this mock server private
Note: The number of calls made to mock servers might be limited by your Postman account. Check your usage limits.
- Click the Create button.
In the Next steps tab, see a list of suggested next steps to get the most out of your mock server.
Template and API Network tabs
Templates
You can select ‘Templates’ to help you: check links, track Github issues, verify non-MFA access to AWS accounts, monitor the status of URLs, check DNS records, use Postman Echo to test your REST client and make sample API calls, and monitor AWS ElasticBeanstalk environments.
You can view all the templates, or select to view them in the “Developer” or “DevOps” category.
To import a template:
- Click on the template you want. In this example we’re using the “Link Checker” template.
Note: Each template has a description that lists the values required to run the template. In this example, the Link Checker template requires a start_url and a root_url.
- Click the Use this template button to summon the Customization options screen.
This screen lists what Postman will create for you with this template and some configuration options available to you. Postman saves the values you enter as environment variables. Make sure you fill all the fields as these values might be crucial for the template to work properly.
- To configure your monitor, select how often you want the monitor to run and enter the URL you want to monitor in "CONFIGURATION OPTIONS" section.
- Click the Create button.
The Success! screen displays what Postman created for you and suggests next steps to consider to get the most out of the template.
- Click the Okay button to exit the screen.
API Network
The Postman API Network provides the most authentic and actionable directory of public APIs available. Every API listed in this network includes a complete Postman collection, created by the API’s publisher. Postman specifically designed the API list to onboard developers quickly and effectively.
On the left side of the screen, Postman groups the APIs categories such as Marketing, Financial Services, E-commerce, and so on. You can search these categories to find an API.
After you select an API from the list, you can import it into your collections.
To import an API in the API Network:
- Click an API in the API Network list. In this example, we’re using the Auth0 API.
- Click the Run In Postman button to import the the API's collection.
You can see the API you imported in the sidebar.


